
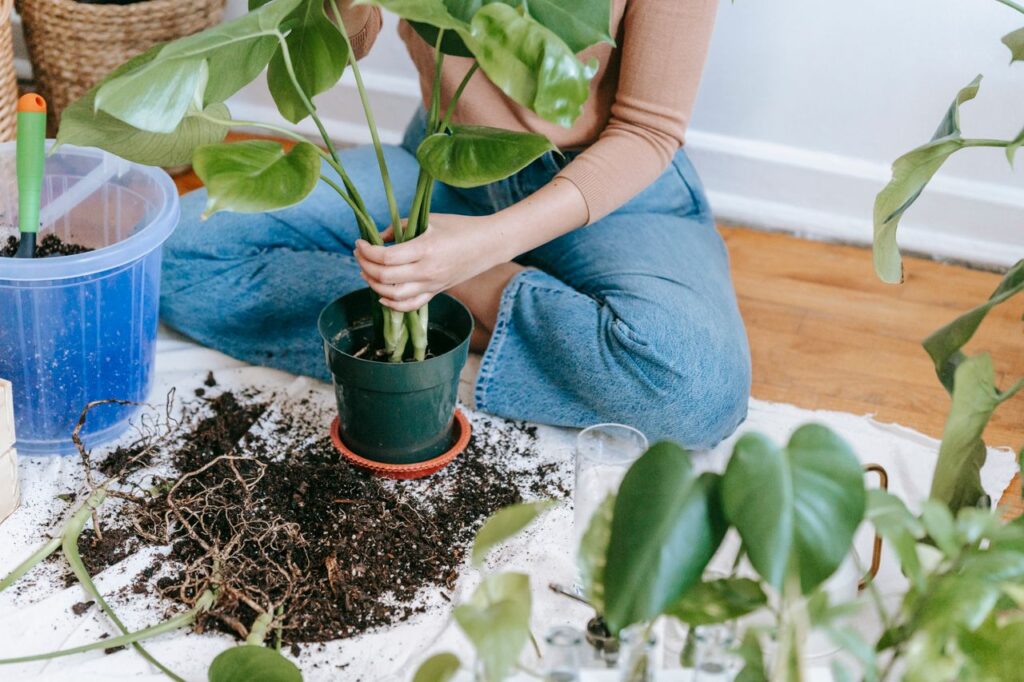
Have you ever pulled a struggling houseplant from its container, stared at the chaotic tangle of root-bound soil, and suddenly worried that one wrong move might kill it?
In my early days as an indoor gardener, I viewed repotting as a nerve-wracking gamble. I used to wait until roots were practically busting through plastic pots before attempting a transfer, often losing delicate foliage to severe transplant shock in the process.
Unpotting a plant doesn’t have to feel like high-stakes surgery. When you understand the physiological cues that signal a root-bound plant and follow a clean, step-by-step technique, repotting becomes the single most refreshing boost you can give your foliage.
In this guide, I will share my personal step-by-step repotting routine, explain how to pick the right pot size, and show you how to prevent transplant shock entirely.
Knowing When It Is Time to Repot
Not every plant that pushes out fresh spring leaves needs a bigger home right away; repotting unnecessarily can actually disrupt root systems and slow down growth.
I always inspect the base of my planters first. When roots begin circling aggressively out of bottom drainage holes, or when water pours straight through the pot without soaking the substrate, the plant is telling you its roots have displaced the soil matrix.
Another clear sign I look for is stunted growth during peak spring and summer months, accompanied by soil that dries out within two days of a heavy soak.
When a plant becomes severely root-bound, the lack of surrounding soil means there is no medium left to hold moisture or liquid fertilizer, causing foliage to stall and lower leaves to turn yellow.
Choosing the Right Pot Size and Materials
The single biggest mistake I see beginners make during repotting is jumping to a container that is far too large for the current root ball.
Moving a houseplant from a small 4-inch nursery pot directly into a massive 10-inch ceramic planter creates a dangerous ratio of excess soil to root mass.
Without enough roots to drink up water held in that massive block of damp soil, the substrate stays soggy for weeks, creating an ideal environment for root rot to take hold.
I always follow the “two-inch rule”: upgrade to a planter that is only 1 to 2 inches larger in diameter for small-to-medium plants, and 2 to 3 inches larger for massive floor plants.
Ensure your new planter features functional bottom drainage holes so excess water escapes freely every time you water.
Pre-Repotting Tool and Material Setup
Setting up a clean, organized workspace before you slide your plant out of its container prevents messy accidents and keeps root exposure times short.
- Fresh Chunky Soil Mix: Prepare a well-aerated potting substrate using commercial soil mixed with perlite and coarse orchid bark.
- Waterproof Repotting Mat: Unfold a snapshot tarp over your tabletop to keep soil spills completely contained while you work.
- Sterile Pruning Shears: Clean your cutting blades with 70% isopropyl alcohol in case you need to trim dead or rotted roots.
- Fresh Nursery Pots: Keep a few sizes of clear plastic nursery pots on hand for easy double-potting inside decorative cover planters.
Get your tools ready! Explore The Ultimate Apartment Repotting Kit: What You Need to Get Started and upgrade your plants like a pro.
Repotting Guide & Timing Matrix
To help you decide whether your plant needs a full pot upgrade or simple soil maintenance, check out this quick reference guide based on my home care schedule:
| Plant Sign / Condition | Recommended Action | Target Pot Upgrade | Best Time of Year |
| Roots circling out of drainage holes | Full Repot & Pot Upgrade | 1 to 2 inches larger | Spring to Early Summer |
| Soil dries out every 24–48 hours | Full Repot & Pot Upgrade | 2 inches larger | Spring to Mid-Summer |
| Old soil crusty, but roots aren’t bound | Refresh Soil (Same Pot) | No size increase | Early Spring |
| Plant dormant or winter season | Wait & Postpone | Delay until Spring | Avoid Winter Repotting |
Step-by-Step: How to Repot Safely
Here is the exact step-by-step process I use to transfer my tropicals without causing root damage or messy soil spills:
- Water Two Days Prior: Water your plant thoroughly 24 to 48 hours before repotting. Hydrated root tissues are flexible and far less prone to snapping during handling.
- Unpot Gently: Never pull a plant forcibly by its main stems. Squeeze the flexible sides of the plastic pot gently, invert the container while supporting the main stem base, and let the root ball slide out naturally.
- Loosen Root-Bound Balls: Gently tease the outer root ball with your fingers to loosen tightly matted roots, encouraging them to expand outward into fresh soil.
- Build a Soil Foundation: Pour a layer of fresh potting mix into the bottom of your new planter so the top of the plant’s root ball sits about an inch below the pot rim.
- Set and Fill: Place the root ball centered in the pot and fill the surrounding gap with fresh mix. Tamp the soil down lightly with your thumbs to remove large air pockets without compacting it too tightly.
Post-Repotting Care: Preventing Transplant Shock
Once your plant is settled into its new home, the care you provide over the following two weeks determines how quickly it recovers from the move.
Give your freshly repotted plant a thorough watering until liquid runs freely out of the bottom drainage holes, settling the fresh soil around root structures.
Place the plant back in its usual light spot, keeping it away from harsh, direct sunlight or drafty air conditioners for a week while it stabilizes.
Hold off on applying any synthetic fertilizers for at least four to six weeks after repotting.
Fresh commercial potting mixes usually contain starter nutrients, and applying added fertilizer to tender, settling roots can easily cause tip burn and root shock.
Give Your Roots the Room They Need
Mastering the art of mess-free repotting gives your indoor jungle the foundation it needs to push out oversized, healthy foliage season after season.
By sizing up gradually, teasing root balls gently, and allowing fresh soil to do the heavy lifting, you turn what used to feel like a stressful chore into a rewarding maintenance routine.
Inspect your houseplant collection today, check for roots peeking through bottom drainage holes, and give your favorite green companions room to reach their full potential!
Want to master more essential houseplant care strategies? Explore the rest of our blog guides to discover specialized soil recipes, pest control solutions, and expert care routines for every plant parent!
 Small Spaces
 Turn your small space into an urban jungle! Discover step-by-step how to build a mess-free, freestanding living green wall divider for ultimate apartment privacy.
 Plant Care
 Dust is a silent killer! Learn step-by-step how to clean houseplant leaves naturally to boost photosynthesis, prevent pests, and restore vibrant shine.
 Plant Care
 As a pet owner, bringing new plants into your home can feel like a risky game. Curiosity often gets the […]
